I think the most challenging thing I face is "changing plans." I mean, when it comes to little things mayyyybe I will be okay, but if you ask my friends and family, they will tell you, changing plans isn't my number one strength. But, I have learned, through the times of changing plans, that the only reason plans change is because they are mine, not God's.
The following is a chronological list of my plans that were then changed in to God's plans:
1. Attend Carroll College // God had me go to Azusa.
2. Be a psych major // became a Special Education major
3. Student teach in Spring 2015 // not student teach in Spring, but instead work as a long term sub and get paid and experience at my Alma Mater.
4. Return to Steele Canyon for my student teaching // got HIRED at Valhalla to be paid full salary as I taught as an intern and then continued to the position for the rest of the school year.
And most recently:
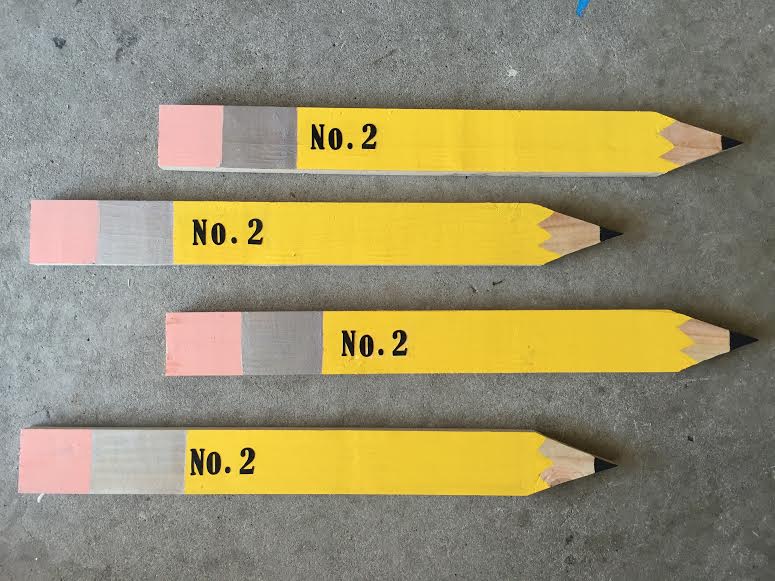
5. Make an awesome "Miss Ritter" sign for my classroom using a fence piece to look like a pencil // made awesome smaller pencil signs (picture below) for my classroom for my name and the rest of my decorative labelling needs.
So, you see, my plans may have been decent, but God's plan always seemed to outshine them. God's plan always proves to be so much greater than what I can imagine. Yes, I am talking about the "big" things, but I am also talking about rejoicing in the fact that for the life of me I could not find the fence post I needed to create my sign, but I was pointed in the direction of small garden posts that were even better, too.
God's plan for your life may change your dreams. Honestly, you will probably cry and become frustrated when the road turns in a direction that you didn't have mapped out, but what I am here to say is this: I have cried those tears, but then, I wipe them away because I know those tears will soon turn to tears of pure joy and gratitude. God does not take you down the wrong road, God knows the entire road map, all you can see is right in front of you. Be strong, be grateful, and cry those tears because I promise you will be smiling soon enough.
Tutorial on my signs below.
The following is a chronological list of my plans that were then changed in to God's plans:
1. Attend Carroll College // God had me go to Azusa.
2. Be a psych major // became a Special Education major
3. Student teach in Spring 2015 // not student teach in Spring, but instead work as a long term sub and get paid and experience at my Alma Mater.
4. Return to Steele Canyon for my student teaching // got HIRED at Valhalla to be paid full salary as I taught as an intern and then continued to the position for the rest of the school year.
And most recently:
5. Make an awesome "Miss Ritter" sign for my classroom using a fence piece to look like a pencil // made awesome smaller pencil signs (picture below) for my classroom for my name and the rest of my decorative labelling needs.
So, you see, my plans may have been decent, but God's plan always seemed to outshine them. God's plan always proves to be so much greater than what I can imagine. Yes, I am talking about the "big" things, but I am also talking about rejoicing in the fact that for the life of me I could not find the fence post I needed to create my sign, but I was pointed in the direction of small garden posts that were even better, too.
God's plan for your life may change your dreams. Honestly, you will probably cry and become frustrated when the road turns in a direction that you didn't have mapped out, but what I am here to say is this: I have cried those tears, but then, I wipe them away because I know those tears will soon turn to tears of pure joy and gratitude. God does not take you down the wrong road, God knows the entire road map, all you can see is right in front of you. Be strong, be grateful, and cry those tears because I promise you will be smiling soon enough.
Tutorial on my signs below.
Materials
Garden Posts (size dependent on your choosing)
Yellow, silver, black, & pink paint (house paint works best)
Cricut Letter Cutter or letter/ alphabet stickers
Mod Podge
Brushes/ Sponge painters of various sizes (small, medium)
Sand Paper
Paint Tape
1. Sand down all sides of posts
2. Tape off a "W" shape about 3 inches from the point with painters tape
3. Put a line of tape 5 inches from the straight end and then another about 3 inches from the end
4. Use black paint to make the tip
5. Use yellow paint to paint the largest portion of post (between the "W" and the tape line furthest from straight edge)
6. Take of "W" tape and clean up lines with yellow paint and tiny tip paint brush
7. Wait for Yellow to dry, do another coat if necessary
8. Take tape line 6 inches from straight edge off and carefully use the silver paint to fill in between the yellow and the other piece of tape
9. Wait for silver to dry, do another coat if necessary
10. Take off last piece of tape and fill in from edge to the silver edge with light pink paint
11. Wait for pink to dry, do another coat if necessary
12. Use "No. 2" stickers or cutouts and secure them 1 inch away from silver/ yellow border
13. Place how you desire
14. Use mod podge by pressing sponge on to letters and then smooth the mod podge out over letters
15. All done! (Just wait for them to dry!)
You can ha these by adding nails to the back and tying ribbon or string to them, or you can use a picture hanging kit. Personalize them by adding other stickers/ cutouts! A great decoration for teachers' classrooms!
 RSS Feed
